Please read the comments which have some updates regarding email config. You can find me on https://noc.social/web/@marc
Some people are really not too happy with Silicon Valley’s monopoly on social media. There are some serious privacy concerns, and we’ve seen a massive migration from Whatsapp to Signal, and whatever you may think of the accusations against Parler, the alacrity shown in it’s thorough deplatforming by it’s competitors, many are shocked.
I have advocated for decentralized social networks for many years, and some who I have preached to have come to me asking for assistance. I won’t go into my reasoning in this post, it’s been a tough one I have been putting together for a while now.
There are many ways of getting involved with decentralized social networks.
For a start there are a few options besides Mastodon. Secondly there are many ways of getting an account on a Mastodon server, there is a huge list of servers offering free accounts in many cases. You can rent a preconfigured server instance which would be fine maybe for a small family (they have strict ToS, which you should check). For a large busy instance you would want to build something scalable you may want to use Docker or Kubernetes using this sort of method, or follow the official guide here.
But here below, as I have not found a nice simple guide I am going to describe how you can setup a simple, and scalable Mastodon instance at DigitalOcean, with a built in mail server hosting images locally, along with a simple firewall setup.
First you will need a Domain name, or a subdomain of an existing domain name, there are many vendors to choose from, I’m lucky my last name is pretty unique.
Next you will need an account at DigitalOcean, if you sign up using this link, you will get a $100 hosting credit, and I get a $25 gift for the referral, here it is again, if you missed it.
(Edited 04/11/22: You can not use SMTP on a new DigitalOcean account now, you would need to use a “mature” account, or use a 3rd party mailing service. https://www.digitalocean.com/blog/smtp-restricted-by-default)
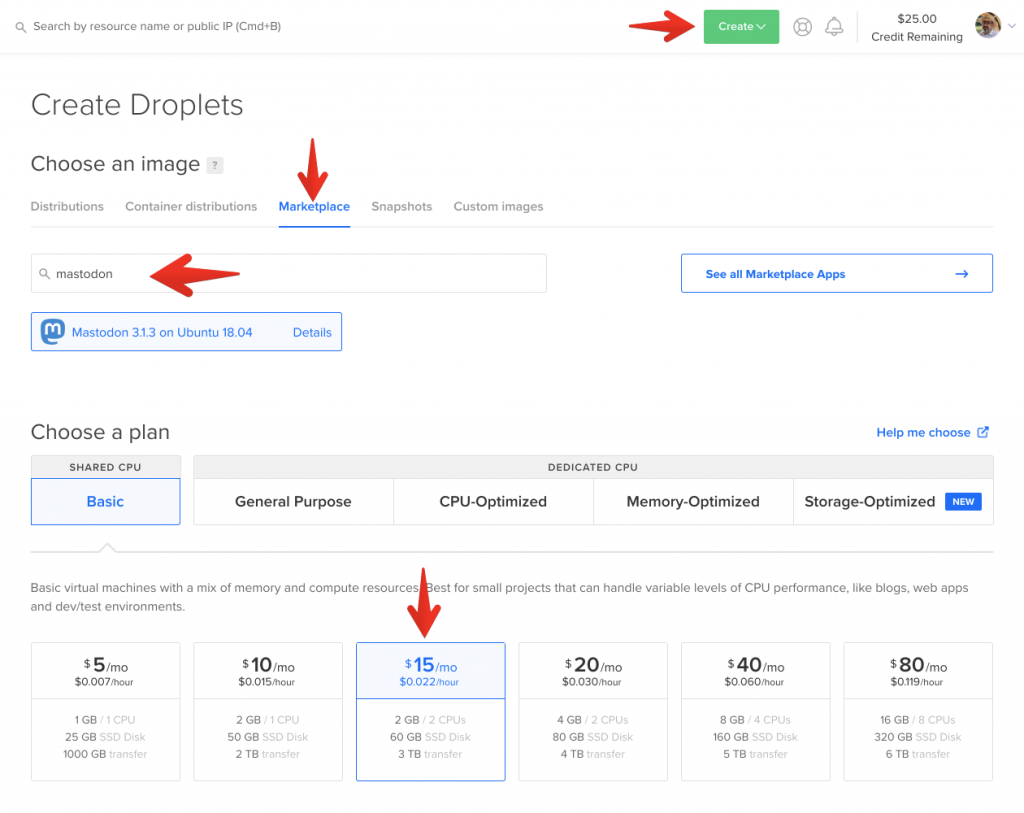
Start by clicking Create, Marketplace, type Mastodon, and select it, select a server size, $15 instance seems a minimum for a reasonably busy, powerful server with a fair bit of storage.
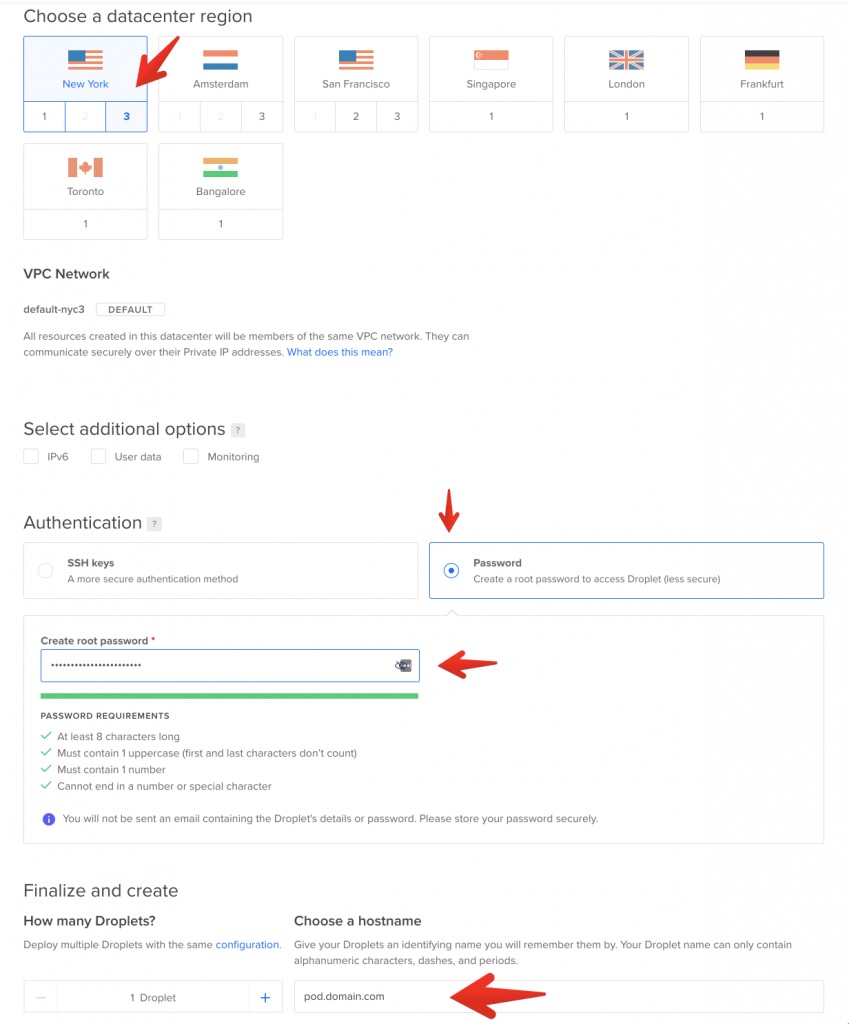
Next choose a Datacenter near you, ideally you should use an SSH key pair and apply that here instead, but I know you won’t, so just make sure to use a really strong unique password, and keep it safe. Where you see Choose a hostname, enter the domain name or subdomain you are going to use, for the purpose of this walkthrough, I’ll be using pod.domain.com. I would also strongly recommend having backups which you can accept on this page, DigitalOcean charge 20% on server cost for a once a week backup, you can do far better, but this is simple, (I would also recommend before you make any potentially damaging changes, making a Snapshot of your server, as these are very easy to roll back to if needed, just remember to delete them when you are done.) Scroll to the bottom and click create.
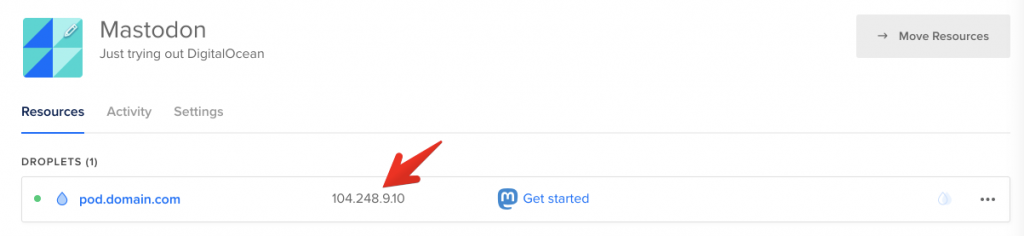
Once it’s completed, normally 60 seconds, copy the IP address it has provisioned your server with.
Head over to your where your domain is registered and add an A record in their DNS management, something like this, all domain management tools tend to be similar, and would have good guides on creating or editing DNS A records.
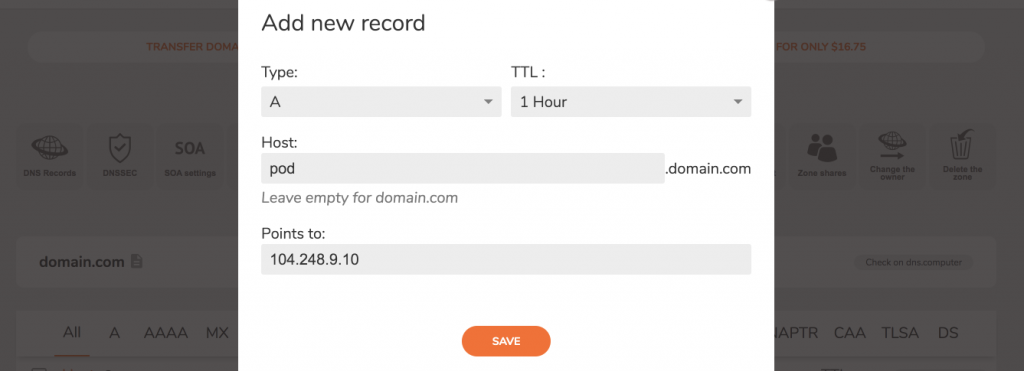
While we are here, I’ll also add a TXT SPF record which should make your email less likely to hit spam folders, new servers take a little time to be recognized as legitimate, this record will help. Add this DNS TXT record, changing the IP to match yours:
v=spf1 ip4:104.248.9.10 -all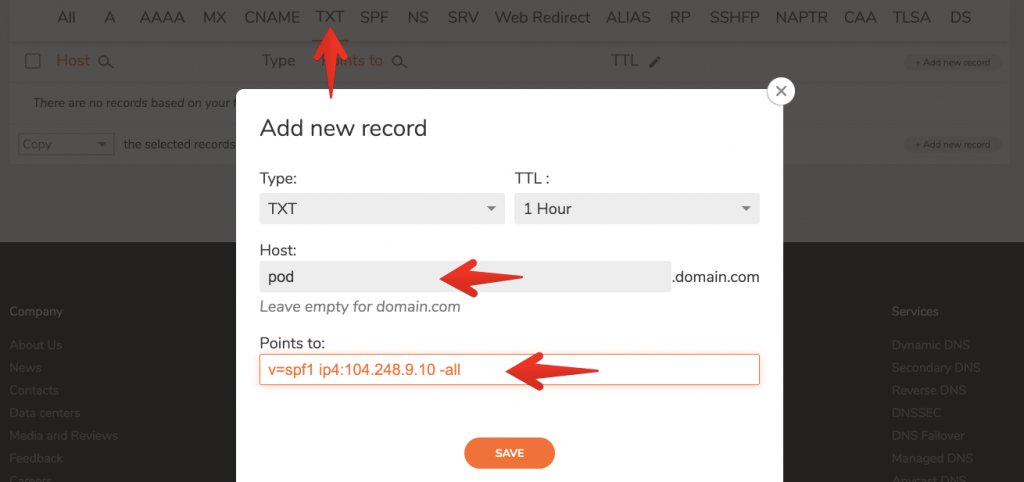
Now to log into your server, this can be using any shell, Terminal on a Mac or Linux, or Putty on a Windows machine. Here I’m using my Macbook, login with the domain name or IP as root:
ssh root@pod.domain.comenter your password (or don’t if your using an ssh key pair), accept the ECDSA key by typing yes..
$ ssh root@104.248.9.10
The authenticity of host '104.248.9.10 (104.248.9.10)' can't be established.
ECDSA key fingerprint is SHA256:Wsv74TT7SBLN0Al4R6NrecifEclL35BPBxiQgEtShv0.
Are you sure you want to continue connecting (yes/no/[fingerprint])? yes
Warning: Permanently added '104.248.9.10' (ECDSA) to the list of known hosts.
root@104.248.9.10's password:
Welcome to Ubuntu 18.04.4 LTS (GNU/Linux 4.15.0-91-generic x86_64)
---snip---
Booting Mastodon's first-time setup wizard...
Welcome to the Mastodon first-time setup!
Next, lets configure the Mastodon instance, enter the domain name, choose No for storing images in the cloud, (if your server is successful, you can host images with AWS or any other cloud provider very cheaply later.) For SMTP server, type localhost, for the next 4 questions, port, username, password and authentication, hit return to select the default values. for verify mode, select none. Accept the email address provided to send emails from, do not send a test email yet, it will fail. Choose your username and enter your real email for the Mastodon admin account, enter the email address again when Let’s Encrypt asks for it. So you should have something like this.
Welcome to the Mastodon first-time setup!
Domain name: pod.domain.com
Do you want to store user-uploaded files on the cloud? No
SMTP server: localhost
SMTP port: 587
SMTP username:
SMTP password:
SMTP authentication: plain
SMTP OpenSSL verify mode: none
E-mail address to send e-mails "from": Mastodon <notifications@pod.domain.com>
Send a test e-mail with this configuration right now? no
Great! Saving this configuration...
Booting up Mastodon...
It is time to create an admin account that you'll be able to use from the browser!
Username: admin
E-mail: admin@domain.com
You can login with the password: YOUR-PASSWORD-WILL-BE-HERE
The web interface should be momentarily accessible via https://pod.domain.com/
Launching Let's Encrypt utility to obtain SSL certificate...
Saving debug log to /var/log/letsencrypt/letsencrypt.log
Plugins selected: Authenticator webroot, Installer None
Enter email address (used for urgent renewal and security notices) (Enter 'c' to cancel): admin@domain.com
Update certificates:
sudo apt install ca-certificatesNotice you were provided with the Admin Password above, keep it safe. Now to setup the local mail server, start by installing SendMail with:
sudo apt-get install sendmailYou can send yourself a test email if you like now using:
echo "Subject: sendmail test" | sendmail -v admin@domain.comConfigure Mastodon to use SendMail, open the Mastodon config file with:
nano /home/mastodon/live/.env.productionNavigate with your curser keys and add this line to the bottom:
SMTP_DELIVERY_METHOD=sendmailCrtl+o to save, Crtl+x to exit nano, then correct the localhost configuration for SendMail, again with nano.
sudo nano /etc/hostsAdd your domain name so the 127.0.0.1 line looks like:
127.0.0.1 localhost pod.hostname.comAgain Crtl+o to save, Crtl+x to exit nano, now lets get some better stats on your DigitalOcean control panel:
curl -sSL https://repos.insights.digitalocean.com/install.sh | sudo bashAnd finally, get a simple firewall enabled to block unused ports:
ufw allow ssh
ufw allow http
ufw allow https
ufw allow 25/udp
ufw enable
Thats it, your Mastodon server is up and running, and you can now login, you’ll first want to head over to https://pod.yourdomain.com/admin/invites to generate an invite link to send to friends and family. for the first few days, email will go to the spam folder, this is expected.
Tons of resources here: https://project-awesome.org/tleb/awesome-mastodon
There is far more that can and should ideally be done, DigitalOcean have a very robust firewall that works at a network level, there are better backup and image hosting solutions. And the mastodon instance itself can be personalized. make something nice, and please ping me your address so I can check it out.
Added Nov 6 2021,
It is important to prune media and preview cards, this can be done ad hock, logged in as masterdon user with something like:
RAILS_ENV=production /home/mastodon/live/bin/tootctl media remove
RAILS_ENV=production /home/mastodon/live/bin/tootctl preview_cards remove
Or adding as a cron (using crontab -e, then crontab -l to test) adding:
@weekly RAILS_ENV=production /home/mastodon/live/bin/tootctl media remove
@weekly RAILS_ENV=production /home/mastodon/live/bin/tootctl preview_cards remove
If you get ruby errors, “Could not locate Gemfile” you may need to install
git clone https://github.com/rtomayko/posix-spawn.git
cd posix-spawn/
gem build posix-spawn.gemspec
gem install posix-spawn*.gem
Hi, Marc. Thank you for posting these instructions. I could not find these instructions anywhere on digital ocean.
I added a test user from my main site at fccc.world and did not receive a confirmation email (no email in junk folder either) . I am wondering if the sendmail instance I set up is not working correctly or not? Or how can I test if this is working or not? It’s been *years* since I did command line stuff so I’m seriously rusty at all this.
Any and all help appreciated on this. I especially want to be able to customize my instance with different color schemes, perhaps a few graphics, etc.
Can think of 2 things to start with.
Your reverse IP record is mastodon.fccc.world unless you are sending email from something@mastodon.fccc.world you should change that.
I think you’ll find the maillogs and any errors with:
$ tail -f /var/log/maillog
What a great tutorial! Thank you so much.
I followed every step but now I am having trouble getting into the admin panel.
How can I access to Admin dashboard? Can you please help me? I am new to these things and I just jumped into it.
It was a pleasure and a privilege speaking with you. Thank you for your knowledge, dedication and insight.
Hi, this was useful, thanks.
For me I had to finish the install at the web interface before running those apt commands as the install seemed to have the packages locked.
I also had to set the hostname explicitly to the hostname I wanted to using hostname -b
And finally the droplet seemed to need rebooting before it would actually send emails.
Otherwise, very handy, thanks.
Thank you for the update Chris, it’s been a while, maybe some changes with Mastodon or Ubuntu which I ran this playbook on a few times last year. Maybe your update will help someone stuck. Good luck with the pod.
DigitalOcean now restricts the use of SMTP for new accounts, so it is no longer possible to use sendmail directly: https://www.digitalocean.com/blog/smtp-restricted-by-default
Thank you for the update, I will update the article.
That is disappointing, and very awkward for any number of other aps and cms require smtp for proper operation out of the box, even WordPress requires it out of the box.
I hope they weren’t bullied by these scammers
https://blog.sucuri.net/2021/02/uceprotect-when-rbls-go-bad.html
Personally I’ve had my DigitalOcean account for over a decade, so wouldn’t be affected.
as a new digitalocean user, and a newbie sysadmin, I am very confused! your guide is extremely helpful and I was able to get everything up and running just fine, but I don’t know how to bolt in some kind of new email handling function. I’ve now signed up for google workspace and am trying to use their sendmail stuff, but it’s a very steep learning curve!
Here’s what should work looking at my own gmail settings if added to env.production
Some discussion here using generic SMTP
https://draklyckan.se/2021/10/setting-up-email-in-mastodon/
I think google workspace you need to list the domain being used to send email.
Please let me know how you get on, if I need to change anything being suggested or if you need further hints.
Hey Marc, thanks for a simplified breakdown. I have an instance that I’m trying to get going but have a few issues.
I went the S3 route for storage and curious what the settings in env.production would be to just use Digital Oceans as I’ll be the only one using the instance — Having issues with permission on S3 and running in circles 🙁
I’m going to try your SMTP settings for Gmail as well to avoid the same issue with Sendmail.
I was wondering however, is there a way to rename the admin username? I named it Admin and would prefer it be my username. If not, perhaps I can create another user and give them admin access?
If so, is that done using RAILS_ENV?
Thanks for helping us all out, truly appreciated 🙌
Nice walk though here setting up with an S3 bucket https://github.com/cybrespace/cybrespace-meta/blob/master/s3.md
Make sure you have given the Masto server IP address access to the bucket, that caught me once as I think default they are full locked down.
I wouldn’t be using my default admin account for general use anyway, create a new user, and elevate permissions to admin.
adding a “.” in the user part of an email address usually allows you to use the same email address on multiple accounts, so maybe first.last@ is the same as firstlast@.
After install, I’m getting 500 errors on most searches and when trying to upload images.
There isn’t anything to go on from the browser console and I’m not seeing any logs. I see an empty log folder under the mastodon home and the journalctl is simply returning “No journal files were found”
Any tips on how to debug these 500 errors?
Prob coming from NGINX, Check /var/log/nginx, those are pretty meaningful logs, also check your resources with top (or i prefer htop).
Good point. Nothing super revealing in the nginx log. No errors. I do see the 500 in the access log.
..IP.. – – [20/Nov/2022:00:44:36 +0000] “POST /api/v2/media HTTP/2.0” 500 894 “…HOST…” “Mozilla/5.0 (Macintosh; Intel Mac OS X 10_15_7) AppleWebKit/537.36 (KHTML, like Gecko) Chrome/107.0.0.0 Safari/537.36”
Load is at 0.01 and swap is not being used..
Sorry, 500 errors are far to generic for me to help here, but one more suggestion, check the ownership of /opt/mastodon/public/ is mastodon and not root, and correct if needed.
Turns out rebooting the droplet makes the logs work :shrug:
Once I had logs I could see that I needed to enable Object Level ACLs.
I’m going to reach out to the folks that made tutorials that I found and let them know to add that.
Must have: “ACLs Enabled” under Bucket / Permissions / Object Ownership
Now I need to figure out why my friends on other servers are showing up with 0 posts.
For sure. /opt/mastodon/public seems fine
I tried adding RAILS_LOG_LEVEL=debug to the .evn.production and journalctl is still returning
No journal files were found.
— No entries —
Hi for some reasons chrome is saying that my site is not safe. Is it something to do with the SSL certificate. I registered the site through godaddy and used the 1-click digitalocean masterdon setup. Everything seems to be working great except for the secure connection in the browser. Any ideas? Should I try install a certificate with GoDaddy?
Looks good to me https://www.ssllabs.com/ssltest/analyze.html?d=besocial.co.za&latest
Common names besocial.co.za
Alternative names *.besocial.co.za besocial.co.za
Serial Number 04e51f2283df6fa7e393ae568f6a79805222
Valid from Mon, 21 Nov 2022 09:49:21 UTC
Valid until Sun, 19 Feb 2023 09:49:20 UTC (expires in 2 months and 28 days)